How to Set Up an Exit-Intent Popup: Step-by-Step Guide for 2024
Learn how to set up an exit-intent popup on any website. This detailed guide covers plugins and code methods, mobile tips, troubleshooting, and GDPR compliance—boosting conversions by up to 10%.

Are you losing potential customers just as they’re about to leave your website? An exit-intent popup can turn abandoning visitors into subscribers or buyers—often boosting conversions by 5–10% (sources, OptinMonster case studies). This hands-on, beginner-friendly guide will walk you through every step to setting up a high-performing exit-intent popup, no matter your website platform or skill level.
What Is an Exit-Intent Popup and Why Use One?
An exit-intent popup is a modal window triggered when a visitor’s behavior indicates they’re about to leave your website (e.g., their mouse moves toward the browser’s close button). It’s the last, best chance to capture a lead, deliver a discount, or reduce abandonment. Leading studies and SaaS providers (see Wisepops) show that well-designed exit popups consistently uplift conversion rates without damaging user experience—provided they’re targeted and non-intrusive.
You’ll Learn How to:
- Choose the right tool (plugin or code)
- Craft effective popup content
- Launch in under an hour
- Prevent common technical errors
- Ensure GDPR & mobile compatibility
Preparation Checklist: What You’ll Need
Before you start, make sure you have:
- Admin access to your website’s CMS (WordPress, Shopify, Webflow, etc.) or ability to add code
- A clear offer/message (e.g., coupon, free download, subscribe form)
- Selected pages/audience to target
- Popup assets ready (copy, images, privacy notice)
- Checked for plugin compatibility and GDPR compliance features
- Access to website analytics for tracking results
Download and print a checklist here (external resource) to stay organized!
Step 1: Pick Your Approach (Plugin vs. Manual Code)
1. Use a Plugin or SaaS Popup Tool (Recommended for Most Users)
Best for: WordPress, Shopify, Wix, Weebly, Squarespace, or anyone seeking fast, code-free setup.
Popular tools:
2. Add Custom Code (JavaScript)
Best for: Webflow, custom HTML sites, advanced users, or where plugins are not an option.
Note: This method gives full control and can be adapted for any platform, but requires more testing.
Step 2: Set Up an Exit-Intent Popup Using a Plugin/SaaS Tool
Estimated time: 10–20 minutes (Plugin method)
**A. For WordPress (Example: OptinMonster or Popup Maker)
**
- Install and activate your chosen popup plugin via the WordPress plugin directory or plugin’s own site.
- Register and connect your account (if using SaaS like OptinMonster or Wisepops, follow the onboarding steps).
- Create a new campaign or popup and select an “Exit-Intent” or “On Exit” trigger from the display rules.
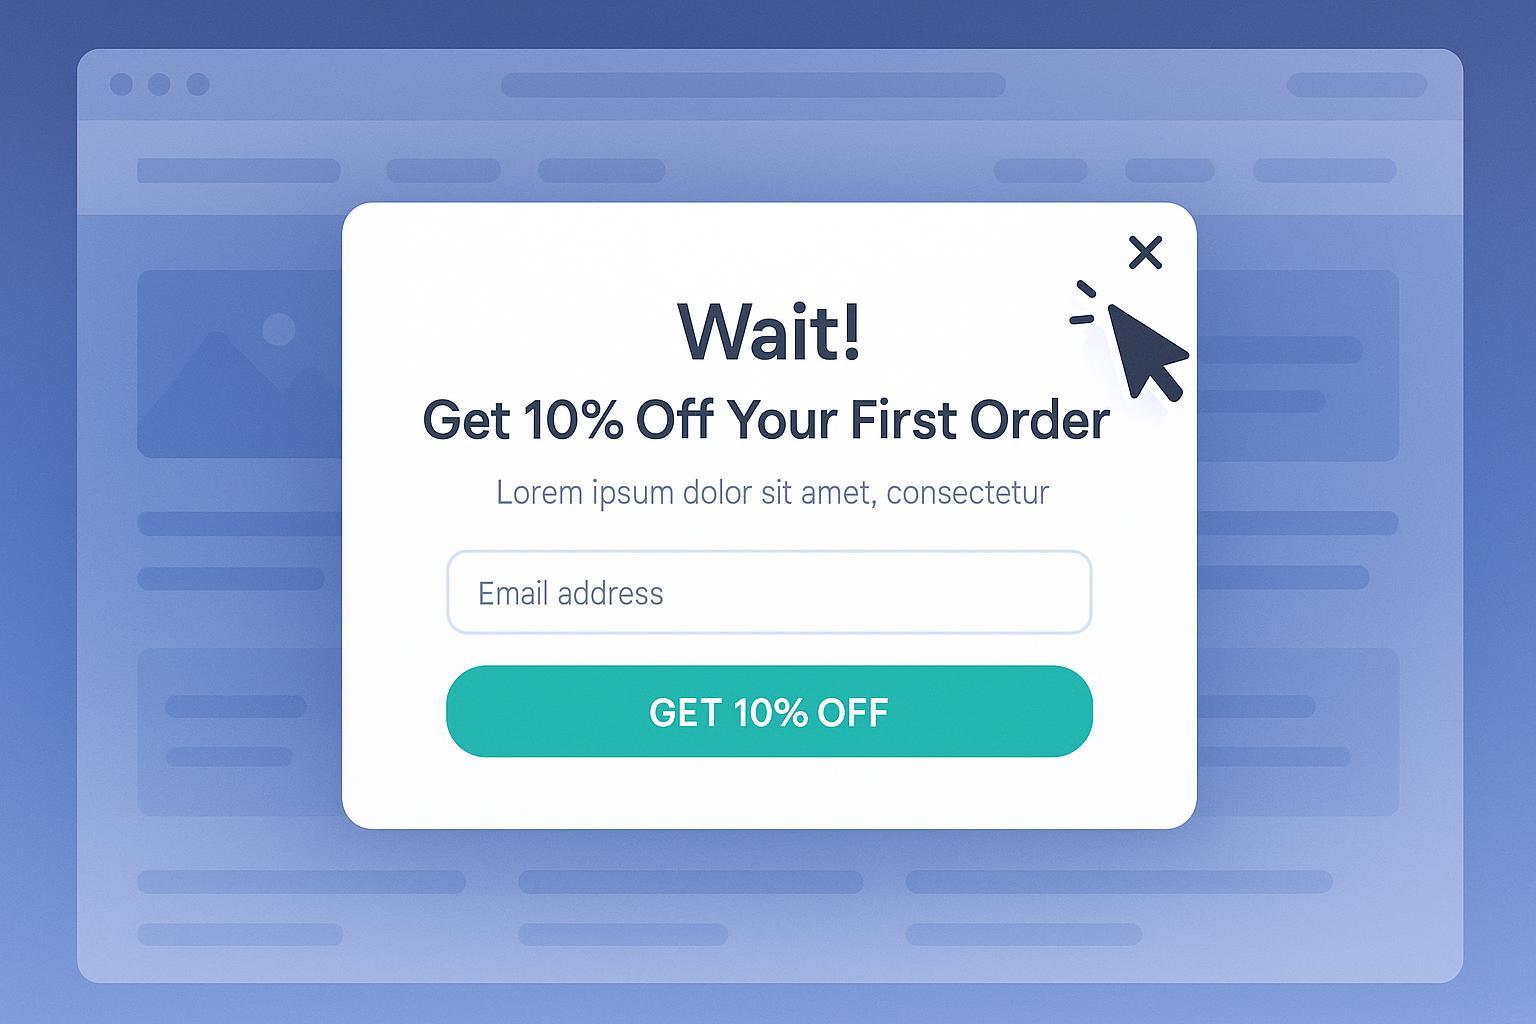
- Design the popup:
- Add your offer, call-to-action, and an obvious close (X) button.
- Include copy that addresses visitor concerns (“Leaving? Grab 10% off before you go!”).
- Insert consent checkbox and link to your privacy policy if collecting data (see GDPR guidance).
- Target specific pages/audiences: Use conditional display options to show on cart, checkout, or blog pages as needed.
- Preview and test your popup:
- Try exiting on desktop (move cursor toward top of screen)
- Test on mobile (see tips below)
- Publish/activate your campaign.
- Monitor results via plugin analytics or Google Analytics.
B. For Shopify (Example: Wisepops, OptinMonster, Sumo, Claspo)
- Install the popup app from Shopify App Store.
- Follow in-app setup wizard: Choose exit-intent trigger, customize content, select target pages.
- Ensure mobile-friendly design: Use templates optimized for mobile; avoid large overlays.
- Set display rules and frequency caps (e.g., once per session).
- Test across devices and save changes.
- Monitor results (most apps have analytics dashboards).
C. For Other Platforms (Webflow, Wix, Squarespace)
- Webflow: See manual code method in Step 3, or use services like Claspo or Wisepops
- Wix/Squarespace: Use their app/extension market or embed popup provider’s script. Steps are similar: install, configure, design, activate, test.
Step 3: Manual Exit-Intent Popup (Custom JavaScript Solution)
Estimated time: 20–40 minutes (Manual JS method)
A. Basic Desktop Exit-Intent Detection (JavaScript Example)
- Add the following code before your page closing
</body>tag:
<!-- Exit-Intent Popup HTML (hidden by default) -->
<div id="exit-popup" style="display:none;position:fixed;top:0;left:0;width:100vw;height:100vh;background:rgba(0,0,0,0.5);z-index:9999;justify-content:center;align-items:center;">
<div style="background:#fff;padding:32px 24px;border-radius:10px;text-align:center;max-width:350px;">
<h2>Wait! Don't Leave Yet</h2>
<p>Subscribe now and get 10% off your first order!</p>
<form>
<input type="email" placeholder="Your Email" required style="padding:6px;width:70%;">
<br><label><input type="checkbox" required> I agree to the <a href="/privacy" target="_blank">privacy policy</a>.</label>
<br><button type="submit" style="background:#09f;color:#fff;padding:8px 16px;margin-top:10px;">Get Discount</button>
</form>
<button onclick="document.getElementById('exit-popup').style.display='none';" style="position:absolute;top:8px;right:12px;font-size:24px;background:none;border:none;">×</button>
</div>
</div>
<script>
let popupShown = false;
document.addEventListener('mouseout', e => {
if (!popupShown && (!e.toElement && !e.relatedTarget) && e.clientY < 50) {
popupShown = true;
document.getElementById('exit-popup').style.display = 'flex';
}
});
</script>
Pro Tip: Use cookies or
localStorageto ensure the popup only appears once per visit/session (see this guide).
B. Mobile Adaptation
- Detecting exit intent on mobile requires different triggers (user scrolls up quickly, becomes inactive, or hits the back button). Use plugin options for “mobile exit intent” or adapt your JS using tips here.
- Best practice: Use slide-in bars or sticky banners on mobile, and never block the whole screen.
Step 4: Test, Troubleshoot, and Optimize
- Test on all devices and browsers: PC/Mac, iOS/Android, Chrome, Safari, Firefox, Edge.
- Check for trigger reliability: The popup should only show when the visitor tries to leave (not by accident).
- Review design: Ensure close button is visible, popup is mobile-friendly, consent box is present if collecting data.
- Limit frequency: Use plugin settings/cookies for display rules (e.g., once per session, once per week).
- Analyze performance: Use built-in analytics or Google Analytics (see setup guide).
- Run A/B tests: Test different offers, copy, timing (A/B ideas here).
Troubleshooting & FAQs
Q: Why isn’t my exit-intent popup showing?
- Check that the trigger and targeting rules are correctly set (plugin admin or JS event logic)
- Make sure the plugin/app is active and not blocked by other scripts
- For custom code: ensure the HTML/JS is in the correct place (just before
</body>) and no JS errors are present (check developer console)
Q: Popup is showing too often or on wrong pages—how do I fix this?
- Set frequency caps and refined targeting rules (show only on exit, limit per user/session)
Q: How do I stay GDPR/compliance-ready?
- Always add a consent checkbox and privacy policy link when collecting emails (GDPR guide)
- Use geotargeting to conditionally display popups for EU visitors if needed
Q: How can I track conversions from my popup?
- Use plugin/app built-in analytics
- Set up Google Analytics events or goals for popup form submissions
Q: Mobile users complain or bounce—what should I do?
- Avoid large overlays; use slide-in/floating bars on mobile
- Test triggers carefully. Some users don’t expect popups—always allow easy dismissal
See a detailed troubleshooting flowchart here.
Pro Tips & Data-Driven Insights
- Average setup time: Plugins: 10–20 mins; manual code: 20–40 mins; mobile tweaks: +10–15 mins
- Success rates: Plugin-based popups trigger correctly 90–98% of the time; code, if tested, 85–95%
- Conversion lift: Expect a 5–10% lift; high-performers can see up to 35% (source)
- Legal necessity: If you’re collecting personal data (email), GDPR/CCPA consent is not optional
- A/B Testing: Regular experiments with offer, copy, and timing regularly outperform “set and forget” popups
- Mobile-first: Always optimize for non-intrusive, responsive popups—Google ranks sites higher for better mobile UX (Claspo guide)
Conclusion: Start Capturing Lost Leads Today!
Setting up an exit-intent popup can make a real, measurable difference for online stores, blogs, and service sites alike—often with less than an hour’s work. For the best results:
- Pick the right tool for your platform and needs
- Nail down your popup’s offer and targeting
- Test, refine, and analyze growth monthly
Ready to implement? Download the exit-intent setup checklist, experiment with both plugin and code solutions, and watch your conversions rise.
Want to explore more ways to boost engagement? Check out:
- Popup Content Optimization Tips
- Lead Capture Form Best Practices
- A/B Testing Playbook
- GDPR Compliance Checklist for Marketers
Now, put your own exit-intent popup live and capture those valuable, last-chance leads!